Introduction
Each issue type by default is associated with a workflow. Workflows help users keep track of which of their issues they have addressed and how far along they are with each.
In this tutorial you will learn how to look up the workflow for the issue you created and then step the issue through the workflow's statuses until it is considered closed (i.e., done).
Prerequisites
You will need to first complete the tutorial Creating Your First Issue so that you have an issue to modify.
Take note of the issue's type and id properties, as you will need them here.
Info
Skill level:
Basic
Duration:
15 minutes
1. Look Up the Workflow
Make a GET request to the Get Workflow endpoint to retrieve the workflow definition.
URL
The URL of the request includes a path of /workflows followed by your issue type. You must also provide projectId as a query string parameter.
Format: https://api.bentley.com/issues/workflows/<type>?projectId=<projectId>
Understanding the Workflow Definition
The workflow definition in the response body consists of two main concepts: states and transitions. States are named statuses that an issue can have as the value of its status property. Transitions dictate the possible changes between states; if an issue is in Status A, then it can be changed to Status B if and only if there is a transition with a start of A and an end of B.
Thus, a workflow can be pictured as a flowchart where states are bubbles and transitions are arrows. Below is a visual representation of the workflow shown in the sample response body.
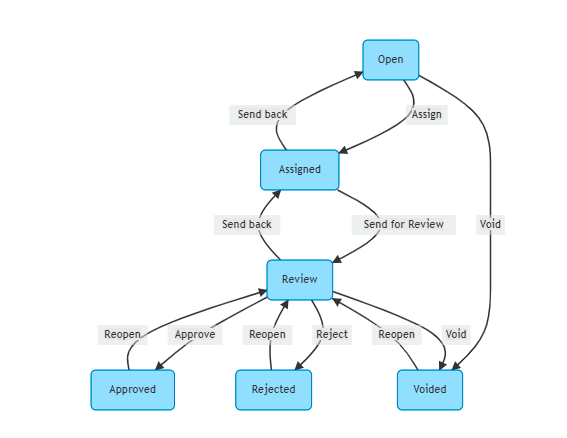
Examine the sample response and note that one of the states in the list of states has a name of "Open". Also, there are transitions named "Assign" and "Void" that both have a start of "Open", and have end values of "Assigned" and "Voided", respectively. Thus, an issue with a status of "Open" can be changed to have a status of "Assigned" or "Voided", but no other values.
Sample request
GET https://api.bentley.com/issues/workflows/<your-issue-type>?projectId=<your-project-id> HTTP/1.1
Accept: application/vnd.bentley.itwin-platform.v1+json
Authorization: Bearer JWT_TOKEN
Sample response
HTTP/1.1 200 OK

{
"workflow":{
  "id":"xospFt7H20-9uSSLOwfBeMrXBKJQWpdOqXbvQ8xzG7s",
  "startStates":["Open"],
  "type":"Field Data",
  "states":[
    {
      "name":"Open",
      "color":"#ff0000",
      "editableProperties":[],
      "stateCategory":"Open"
    },
    {
      "name":"Assigned",
      "color":"#ff9900",
      "editableProperties":[
        "AssignedTo",
        "AssignedToId",
        "_DueDate",
        "_AssignedUsers"
      ],
      "stateCategory":"Open"
    },
    {
      "name":"Review",
      "color":"#ffff00",
      "editableProperties":[
        "AssignedTo",
        "AssignedToId",
        "_DueDate",
        "_AssignedUsers"
      ],
      "stateCategory":"Open"
    },
    {
      "name":"Approved",
      "color":"#66cc00",
      "editableProperties":["!"],
      "stateCategory":"Closed"
    },
    {
      "name":"Rejected",
      "color":"#990000",
      "editableProperties":["!"],
      "stateCategory":"Closed"
    },
    {
      "name":"Voided",
      "color":"#999999",
      "editableProperties":["!"],
      "stateCategory":"Closed"
    }
  ],
  "transitions":[
    {
      "displayName":"Assign",
      "start":"Open",
      "end":"Assigned",
      "notes":"None"
    },
    {
      "displayName":"Void",
      "start":"Open",
      "end":"Voided",
      "notes":"None"
    },
    {
      "displayName":"Send for Review",
      "start":"Assigned",
      "end":"Review",
      "notes":"None"
    },
    {
      "displayName":"Send back",
      "start":"Assigned",
      "end":"Open",
      "notes":"None"
    },
    {
      "displayName":"Approve",
      "start":"Review",
      "end":"Approved",
      "notes":"None"
    },
    {
      "displayName":"Reject",
      "start":"Review",
      "end":"Rejected",
      "notes":"None"
    },
    {
      "displayName":"Void",
      "start":"Review",
      "end":"Voided",
      "notes":"None"
    },
    {
      "displayName":"Send back",
      "start":"Review",
      "end":"Assigned",
      "notes":"None"
    },
    {
      "displayName":"Reopen",
      "start":"Approved",
      "end":"Review",
      "notes":"None"
    },
    {
      "displayName":"Reopen",
      "start":"Rejected",
      "end":"Review",
      "notes":"None"
    },
    {
      "displayName":"Reopen",
      "start":"Voided",
      "end":"Review",
      "notes":"None"
    }
  ],
  "startingTransitions":[
    {
      "displayName":"Create as Open",
      "start":null,
      "end":"Open",
      "notes":"None"
    }
  ],
  "uninitializedState":{
    "name":null,
    "color":null,
    "editableProperties":[],
    "stateCategory":null
  }
}
}
2. Update the Issue's Status
An issue's status property dictates what step of the workflow it's currently on. When you create an issue, you can set its status to one of the strings listed in the startStates array. Since you didn't set a status when creating your issue in the Creating Your First Issue tutorial, it was automatically set to the first startState, "Open".
To change the issue's status, make a PATCH request to the Update Issue endpoint, just as you did in the Creating Your First Issue tutorial. Include the status property, making sure to set its value according to the workflow transitions.
For instance, to change your issue from "Open" to "Assigned", make a request with the body shown in "Sample Body (1)".
To keep stepping the issue through the workflow, make additional Update Issue requests, using "Sample Body (2)" and then "Sample Body (3)". This will change the issue from "Assigned" to "Review" and then "Approved". Once all of these requests are done, you should get the response shown under "Sample response".
Note that the "Approved" status in the workflow definition has a stateCategory of "Closed" rather than "Open". stateCategory is a conceptual grouping of workflow states into one of three types: "Open", "Closed", and "Draft". Conceptually, to users, an issue in an Open state generally requires attention; one in Closed has been taken care of (or deemed not a problem). A Draft issue is being worked on by its creator and may not be ready for review by others yet. In terms of functionality, Open and Draft issues can both be edited like normal, but a Closed issue cannot be edited except to change its status.
Well done! You now understand how to use the Issues REST API to find an issue's workflow, how the workflow affects updating the issue (the status property), and how the issue becomes open or closed as a result.
PATCH https://api.bentley.com/issues/<your-issue-id> HTTP/1.1
Accept: application/vnd.bentley.itwin-platform.v1+json
Authorization: Bearer JWT_TOKEN
Sample body (1)
{
"status":"Assigned"
}
Sample body (2)
{
"status":"Review"
}
Sample body (3)
{
"status":"Approved"
}
Sample response
HTTP/1.1 200 OK

{
"issue":{
  "id":"xospFt7H20-9uSSLOwfBeBs-UbbpqxhKgAL4wWWajpw",
  "status":"Approved",
  "createdBy":"Andrew Menzies",
  "createdDateTime":"2021-06-11T18:17:45.4807786Z",
  "lastModifiedBy":"Andrew Menzies",
  "lastModifiedDateTime":"2021-06-21T19:43:55.146858Z",
  "assignee":{
    "displayName":"Andrew Menzies",
    "id":"9e39de83-2457-466d-9de3-8d8a186b4189"
  },
  "number":"FID-00002",
  "displayName":"FID-00002",
  "subject":"Which Material? With model ID",
  "description":"Version 1.2 of the plans does not specify what material this support beam will be made out of.",
  "type":"Field Data",
  "container":{
    "id":"2374523948759432"
  },
  "item":{
    "id":"9090096798506970"
  },
  "dueDate":"2021-07-30T00:00:00Z",
  "state":"Closed",
  "properties":{
    "_StatusColor":"#66cc00"
  }
}
}Was this page helpful?