Introduction
The Changed Elements API is a REST API that allows the consumer to inspect what elements have changed in an iModel between two versions of the iModel. In this tutorial, we will explore using the API operations and we will write an iTwin.js application to visualize change.
Info
Skill level:
Basic
Duration:
45 minutes
1. Set up your environment
To do this tutorial, it is recommended that you do the Get started with iTwin Platform first. This tutorial expects that you have a registered application as shown in the quick start tutorial.
1.1 Required materials
This tool provides the backend JavaScript runtime necessary for your computer to read and render code appropriately. It also allows you to run NPM command line (required for every iTwin project).
This is the source code control system for the iTwin repositories.
This is the github repository that you will use in this tutorial. You should clone the start branch as a starting point to follow along. If at any point you are unsure on how to setup the code demonstrated in the snippets, or just want to take a shortcut, the repository's main branch contains the finished tutorial application.
1.2 Suggested materials
This software can help you to develop and debug frontend JavaScript problems.
This is our recommended editor and debugger tool for developing iTwin.js applications. It is free, open source and includes a GUI for working with GIT.
If you want to test the REST API calls directly, you can use Postman or any other solution capable of sending HTTP requests. If you do it this way, you will require an authorization token for the requests to work.
To learn more about how authentication and authorization works in an iTwin powered application, check out the full documentation on how to obtain the token.
2. Overview of Changed Elements API
Before diving into writing code to leverage the changed elements API with an iTwin.js application, let's take a look at the operations that are available in the API first
2.1 Enabling Change Tracking
This is the first operation of the API and is used to enable change tracking of an iModel.
2.1.1 What is change tracking and why do we need it?
An iModel evolves over time. Every time a design file is changed and the iModel is synchronized, new Changesets are published to the iModel, updating the iModel data.
An iModel may contain graphical elements that are related to business data. For example, let's think about a piece of equipment:

This equipment may be displayed in an iModel with a bare-bones Geometric Element, however, business data that relates to it (like the pump diameter in the image above), exists under the properties of a different non-graphical element.
A changeset may contain changes to the equipment's related pump diameter property, but the geometric counterpart of the equipment will not contain a change. To be able to find which elements relate to which change, you can use the Changed Elements API.
The Changed Elements API will track the iModel for changes, and when a Named Version is created, the API will find all related elements that have changed in each of the changesets and store a summary of them in the cloud.
2.1.2 How do I enable tracking in the Changed Elements API?
The API has an operation to enable the changed elements feature for an iModel.
Here is an example request that shows how to enable the APIs change tracking for an iModel, you would just need to replace the iTwin Id, iModel Id and authorization token with your own.
The body should contain a JSON object with a enable property, and it must be either true or false as shown in the example above.
Here is the documentation for this operation.
Example HTTP Request for Enable Change Tracking Operation
PUT https://api.bentley.com/changedelements/tracking HTTP/1.1
Authorization: Bearer JWT_TOKEN
Content-Type: application/json

{
"enable":true,
"iModelId":"myIModelId",
"iTwinId":"myITwinId"
}
2.1.3 My iModel is being tracked for change, now what?
Once change tracking is enabled for your iModel, whenever a new Named Version gets created, either by a design application or a Connector, the API will process the changesets and store the results of what elements have changed in your iModel.
This operation can take time, and the time it takes is dependent on data complexity and size. It is recommended to use a small iModel to do this tutorial if you are following along, as a very large iModel may take hours to process if it has never been processed and has a lot of data.
2.2 Getting Changed Elements
The next operation allows us to query the API to get the elements that have changed after processing is ready. To use this operation, you must provide the start and end changeset Ids that you want to obtain results for. To get changeset Ids, you can use Get iModel Changesets API.
2.2.1 Using the API to get changed elements
Here is an example request that shows how to get the changed elements between two changesets, ensure to replace the iTwin Id, iModel Id, start changeset Id, end changeset Id and authorization token with your own.
This operation will return a JSON object that contains which elements have changed between the two given changeset Ids. The returned JSON corresponds to the ChangedElements interface. We will explore the format a bit more in the Changed Elements JSON Section. Here's an example of the data returned for a single element that changed:

Example HTTP Request for Get Comparison Operation
GET https://api.bentley.com/changedelements/comparison?iTwinId=myITwinId&iModelId=myIModelId&startChangesetId=myStartChangesetId&endChangesetId=myEndChangesetId HTTP/1.1
Authorization: Bearer JWT_TOKEN
Content-Type: application/json
Example result from the Get Comparison Operation
{
"changedElements": {
  "elements":["0x30000000f69"],
  "classIds":["0x670"],
  "opcodes":[23],
  "modelIds":["0x20000000002"],
  "type":[1],
  "properties":[["UserLabel"]],
  "oldChecksums":[[1448094486]],
  "newChecksums":[[362149254]],
  "parentIds":["0"],
  "parentClassIds":["0"]
}
}
3. Putting it to work
Now that we have covered how the API works, we will use it to create a simple application that can visualize change.
We will implement a simple widget that will allow us to use both operations of the changed elements API. It will have a button to enable change tracking, a dropdown that will allow us to pick a named version and another button to visualize the differences between the current version and the one selected in the dropdown.
3.1 Creating the widget
After cloning the main branch of the repository, create a new .tsx file and call it ChangedElementsWidget.tsx. We are going to write a react hook that will allow us to query the named versions of the iModel, so that we can populate the dropdown list to select our version to compare against.
The named versions object also contains the Id of the changesets, which we will use later on to do the API calls.
Now that we have a working react hook for that purpose, we can write our widget component. The widget will have a label, a react select dropdown and two buttons. We will write the button's onClick handlers later on in the tutorial, so we will leave them empty for now.
To stylize the UI component a little bit, create a ChangedElementsWidget.scss file and add the styles shown in the code snippet.
We can now proceed to add the widget to the viewer application.
Necessary imports
import { IModelApp, IModelConnection } from "@itwin/core-frontend";
import { IModelsClient, NamedVersion, NamedVersionState, toArray } from "@itwin/imodels-client-management";
import { Button, LabeledSelect, SelectOption } from "@itwin/itwinui-react";
import React, { useEffect, useState } from "react";
import { useCallback } from "react";
import { ChangedElementsFeatureOverrides } from "./ChangedElemensFeatureOverrides";
import { ChangedElementsClient } from "./ChangedElementsClient";
import "./ChangedElementsWidget.scss";

/**
* React hook to query named versions
* @param props
* @returns
*/
function useNamedVersions(props: { iModel: IModelConnection | undefined }) {
const [versions, setVersions] = useState<NamedVersion[]>();

// Load named versions that can be used for comparison
useEffect(() => {
  const loadChangesets = async () => {
    // Ensure we have a proper iModel with an iModel Id
    if (props.iModel?.iModelId === undefined) {
      console.error("iModel is not valid");
      return;
    }
    /** Uses the IModelClient to the request the Named Version of the IModel. Only selects name and changeset id.  Limited to top 10 Named Versions. */
    const client = new IModelsClient();
    const iModelIterator = client.namedVersions.getRepresentationList({
      urlParams: { $top: 10 },
      iModelId: props.iModel.iModelId,
      authorization: ChangedElementsClient.getAuthorization,
    });

    // Get the versions and set them to our state
    const namedVersions = (await toArray(iModelIterator)).filter((version) => version.state === NamedVersionState.Visible);
    setVersions(namedVersions);
  };
  // Call the asynchronous function to load named versions
  loadChangesets();
}, [props.iModel]);

return versions;
}
Write the widget UI component
export interface ChangedElementsWidgetProps {
iModel: IModelConnection | undefined;
}

export function ChangedElementsWidget(props: ChangedElementsWidgetProps) {
// Named versions of the iModel
const versions = useNamedVersions(props);
// Named version selected in dropdown
const [selectedVersion, setSelectedVersion] = useState<NamedVersion | undefined>();

// Callback for when clicking the 'Visualize Changed Elements' button
const onVisualizeChangedElements = useCallback(async () => {
  // We will implement this later in the tutorial
}, []);

// Callback for when clicking the 'Enable Change Tracking' button
const onEnableTracking = useCallback(async () => {
   // We will implement this later in the tutorial
}, []);

const selectOptions: SelectOption<NamedVersion | undefined>[] = [];
if (versions) {
  for (const version of versions) {
    selectOptions.push({
      value: version,
      label: version.name ?? "Unknown Named Version"
    });
  }
}

// On react select change set the new selected version
const onReactSelectChange = (option: any) => {
  setSelectedVersion(option);
};

return (
  <div className="widget-container">
    <div className="widget-label">Select Named Version:</div>
    <LabeledSelect
      value={selectedVersion}
      options={selectOptions}
      onChange={onReactSelectChange} />
    <Button className={"widget-button"} onClick={onVisualizeChangedElements}>
      Visualize Changed Elements
    </Button>
    <Button className={"widget-button"} onClick={onEnableTracking}>
      Enable Change Tracking
    </Button>
  </div>
);
}
SCSS for the UI Component
.widget-container {
margin: 8px;
}

.widget-label {
color: white;
font-size: 14px;
}

.widget-button {
width: 100%;
}
3.2 Adding the widget to the application
Now that we have the component ready, we need to create a UiItemsProvider that will feed the our widget to the viewer. Create a new file ChangedElementsUiProvider.tsx to put the code in. Then, import the ChangedElementsUiProvider in our App.tsx file, and add the provider to the uiProviders array prop of the Viewer react component.
Then, we must pass the provider to the viewer's react component, and it should now show in right panel like so:
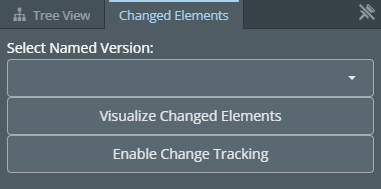
If you want to verify that you have added the code in the right place, you can check the final results for App.tsx, ChangedElementsWidget.tsx and ChangedElementsUiProvider.tsx. Keep in mind that the ChangedElementsWidget.tsx code in the repository is already in its final state, containing button handlers that we will be adding later on in this tutorial.
Create a UI Items Provider
import {
AbstractWidgetProps,
StagePanelLocation,
StagePanelSection,
UiItemsProvider,
} from '@bentley/ui-abstract';
import { UiFramework } from '@bentley/ui-framework';
import * as React from 'react';
import { ChangedElementsWidget } from './ChangedElementsWidget';

export class ChangedElementsUiProvider implements UiItemsProvider {
public readonly id = 'ChangedElementsProviderId';

public provideWidgets(
  stageId: string,
  stageUsage: string,
  location: StagePanelLocation,
  section?: StagePanelSection
): ReadonlyArray<AbstractWidgetProps> {

  const widgets: AbstractWidgetProps[] = [];
  if (
    location === StagePanelLocation.Right &&
    section === StagePanelSection.Start
  ) {
    const changedElementsWidget: AbstractWidgetProps = {
      id: 'ChangedElementsWidget',
      label: 'Changed Elements',
      getWidgetContent() {
        return (
          <ChangedElementsWidget iModel={UiFramework.getIModelConnection()} />
        );
      },
    };

    widgets.push(changedElementsWidget);
  }

  return widgets;
}
}
Import the ChangedElementsUiProvider in App.tsx
import { ChangedElementsUiProvider } from "./ChangedElementsUiProvider";Add the UI Items Provider to the viewer in App.tsx
<Viewer
contextId={contextId}
iModelId={iModelId}
authConfig={{ config: authConfig }}
onIModelAppInit={onIModelAppInit}
backend={{ buddiRegion: 103 }}
uiProviders={[new ChangedElementsUiProvider()]}
/>
3.3 Writing a client for the API
To use the API in our viewer, we will need to create a client class that interfaces with the API and gives us the proper results.
Create a new file called ChangedElementsClient.ts and create a class like shown in the code snippet. We are first going to write functions to create the correct URLs for our operations based on some input parameters, like our iModel's Id and changeset Ids.
Now that we have the scaffolding for the client class, let's add functions for calling the API for each operation.
The getComparison function will use the Get Comparison endpoint to get the ChangedElements that were found between the given changesets, for a given iModel.
The enableChangeTracking function will use the Enable Change Tracking endpoint to enable or disable tracking for an iModel.
Both operations require an authorization token. The repository comes with a simple AuthorizationClient class that will get the necessary tokens as long as your .env file is properly setup as explained in the README of the repo
Here's what the ChangedElementsClient.ts file should look like when you are done with this section.
Changed Elements Client
import { ChangedElements } from "@itwin/core-common";
import { IModelApp, IModelConnection } from "@itwin/core-frontend";
import { Authorization } from "@itwin/imodels-client-management";

/**
* Class for using the Changed Elements API
*/
export class ChangedElementsClient {
/**
 * Get base URL for changed elements API
 * @returns URL for changed elements API
 */
public getUrl() {
  return "https://api.bentley.com/changedelements";
}

/**
 * Function to form the URL for the comparison operation of changed elements API
 * @param iModelId iModel Id to query for
 * @param iTwinId iTwin Id of the iModel
 * @param startChangesetId Start changeset for comparison data
 * @param endChangesetId End changeset for comparison data
 * @returns Url for querying changed elements from the changed elements API
 */
public getComparisonOperationUrl(
  iModelId: string,
  iTwinId: string,
  startChangesetId: string,
  endChangesetId: string
) {
  return this.getUrl() +
    "/comparison?iModelId=" + iModelId +
    "&iTwinId=" + iTwinId +
    "&startChangesetId=" + startChangesetId +
    "&endChangesetId=" + endChangesetId;
}

/**
 * Function to form the URL for the enable change tracking operation of changed elements API
 * @returns Url for enabling/disabling change tracking
 */
public getEnableChangeTrackingUrl() {
  return this.getUrl() + "/tracking"
}

/**
 * Get authorization for getting named versions
 * @returns
 */
public static async getAuthorization(): Promise<Authorization> {
  if (!IModelApp.authorizationClient)
    throw new Error("AuthorizationClient is not defined. Most likely IModelApp.startup was not called yet.");

  const token = await IModelApp.authorizationClient.getAccessToken();
  const parts = token.split(" ");
  return parts.length === 2
    ? { scheme: parts[0], token: parts[1] }
    : { scheme: "Bearer", token };
}

/**
 * Gets the changed elements between two changesets using the changed elements API
 * This results in a GET request to the comparison endpoint
 * @param iModel iModel to test
 * @param startChangesetId Start changeset Id
 * @param endChangesetId End changeset Id
 * @returns ChangedElements object or undefined
 */
public async getComparison(
  iModel: IModelConnection,
  startChangesetId: string,
  endChangesetId: string
): Promise<ChangedElements | undefined> {
  // Parse out iModel Id and iTwin Id
  const iModelId = iModel.iModelId;
  const iTwinId = iModel.iTwinId;
  // Ensure they are properly defined
  if (iModelId === undefined || iTwinId === undefined) {
    throw new Error("IModel is not properly defined");
  }

  // Get the request URL for the comparison operation
  const url: string = this.getComparisonOperationUrl(iModelId, iTwinId, startChangesetId, endChangesetId);
  // Options for the request
  const authorization = await ChangedElementsClient.getAuthorization()
  const options = {
    method: "GET",
    headers: {
      Authorization: authorization.scheme + " " + authorization.token,
      Accept: "application/vnd.bentley.itwin-platform.v1+json",
    },
  };
  try {
    // Execute the request
    const response = await fetch(url, options);
    // Ensure we got a proper response
    const body = await response.json();
    if (response.status === 200 && body?.changedElements !== undefined) {
      // If so, cast the changedElements object of the body as a ChangedElements type
      return body.changedElements as ChangedElements;
    }
    // Something went wrong, log it to console
    console.error("Could not get changed elements. Status: " + response.status + ". Body: " + response.body);
  } catch (e) {
    console.error("Error obtaining changed elements: " + e);
  }

  // We did not get a proper response, return undefined
  return undefined;
}

/**
 * Enable or disable change tracking for an iModel
 * This will cause the iModel to be monitored for named versions
 * Whenever a named version gets created, the changed elements API will process the changesets
 * so that a comparison operation can be made against the new named versions
 * @param iModel IModel to track change for
 * @param value true for enabling, false for disabling
 * @returns true if successful, false if failed
 */
public async enableChangeTracking(
  iModel: IModelConnection,
  value: boolean,
): Promise<boolean> {
  // Parse out iModel Id and iTwin Id
  const iModelId = iModel.iModelId;
  const iTwinId = iModel.iTwinId;
  // Ensure they are properly defined
  if (iModelId === undefined || iTwinId === undefined) {
    throw new Error("IModel is not properly defined");
  }

  // Get the request URL for the comparison operation
  const url: string = this.getEnableChangeTrackingUrl();

  const authorization = await ChangedElementsClient.getAuthorization()
  // Options for the request
  const options = {
    method: "PUT",
    headers: {
      Authorization: authorization.scheme + " " + authorization.token,
      Accept: "application/vnd.bentley.itwin-platform.v1+json",
    },
    body: JSON.stringify({
      enable: value,
      iModelId,
      iTwinId,
    })
  };
  try {
    // Execute the request
    const response = await fetch(url, options);
    // Ensure we get a proper response
    if (response.status === 202) {
      return true;
    }
    // Something went wrong, log it to console
    console.error("Could not enable change tracking. Status: " + response.status + ". Body: " + response.body);
  } catch (e) {
    console.error("Error change tracking: " + e);
  }

  // We did not get a proper response, return undefined
  return false;
}
}
3.4 Using the client
Now, we must implement the onClick handlers of the widget buttons so that they use the client and call the necessary API endpoints. First, ensure you import the ChangedElementsClient to be used in the ChangedElementsWidget.tsx file.
For enabling change tracking, all we need to do is use the client's enableChangeTracking method we wrote earlier. Paste the code in the onEnableTracking callback that we left blank earlier in Section 3.1. For this to work, we just need to pass the iModel object and true to the client's function. If you have not enabled change tracking on your iModel yet, do so now. Keep in mind that as mentioned in section 2.1.3, processing may take a while, so take a break and get some coffee to ensure that the API processes your iModel.
For visualizing changed elements, we are going to need to use the client's getComparison method. This requires us to pass the iModel object, startChangesetId and endChangesetId. We can obtain the iModel from the passed props of the widget. The endChangesetId we can obtain by looking at the iModel's current changeset. For startChangesetId, we need to use the selectedVersion variable we setup in the widget that should contain the changeset Id of the named version that got selected by the user. Paste the code in the onVisualizeChangedElements callback that we left blank earlier in Section 3.1. If you get a 404 response from the Get Comparison operation, it means the API has not yet processed your iModel, and you must wait.
If authorization has been properly setup, you should obtain results from the API. To display the results in the viewport, let's emphasize the elements that have changed on the screen. We can use the EmphasizeElements class, which is a FeatureOverrideProvider that will highlight the elements on the viewport.
The changedElements.elements is an array that contains the element Ids of all elements that have changed in the iModel between the changesets that we are looking at. Here's more information about the ChangedElements result.
Here's what the ChangedElementsWidget.tsx file should look like when you are done with this section.
Import the ChangedElementsClient class in ChangedElementsWidget
import { ChangedElementsClient } from "./ChangedElementsClient"; Enable Change Tracking Button Handler
// Callback for when clicking the 'Enable Change Tracking' button
const onEnableTracking = useCallback(async () => {
const iModel = props.iModel;
// Ensure our iModel is defined
if (iModel) {
  // Create a changed elements client object
  const client = new ChangedElementsClient();
  // Enable change tracking for the iModel
  await client.enableChangeTracking(iModel, true);
}
}, [props.iModel]);
Visualize Changed Elements Button Handler
// Callback for when clicking the 'Visualize Changed Elements' button
const onVisualizeChangedElements = useCallback(async () => {
  const iModel = props.iModel;
  if (iModel === undefined || iModel.changeset.id === undefined) {
    console.error("iModel is not valid");
    return;
  }
  if (selectedVersion?.changesetId === undefined || selectedVersion.changesetId == null) {
    console.error("Selected version is not defined");
    return;
  }
  const client = new ChangedElementsClient();
  const endChangesetId = iModel.changeset.id;
  const startChangesetId = selectedVersion.changesetId;
  const changedElements = await client.getComparison(
    iModel,
    startChangesetId,
    endChangesetId
  );
  // Log the results to console to inspect them
  console.log(changedElements);
  const viewport = IModelApp.viewManager.selectedView;
  if (changedElements && viewport) {
    // Emphasize the changed elements in the view
    EmphasizeElements.getOrCreate(viewport).emphasizeElements(
      changedElements.elements,
      viewport
    );
  }
}, [selectedVersion, props.iModel]);
3.5 Enhancing the change visualization
By now, you should have changed elements being emphasized in your view, but it would be better if we colorize them by their operation codes, see DbOpcode.
To be able to colorize the elements, we will implement our own FeatureOverrideProvider. Create a new file ChangedElementsFeatureOverrides.ts and follow the code snippet to the right.
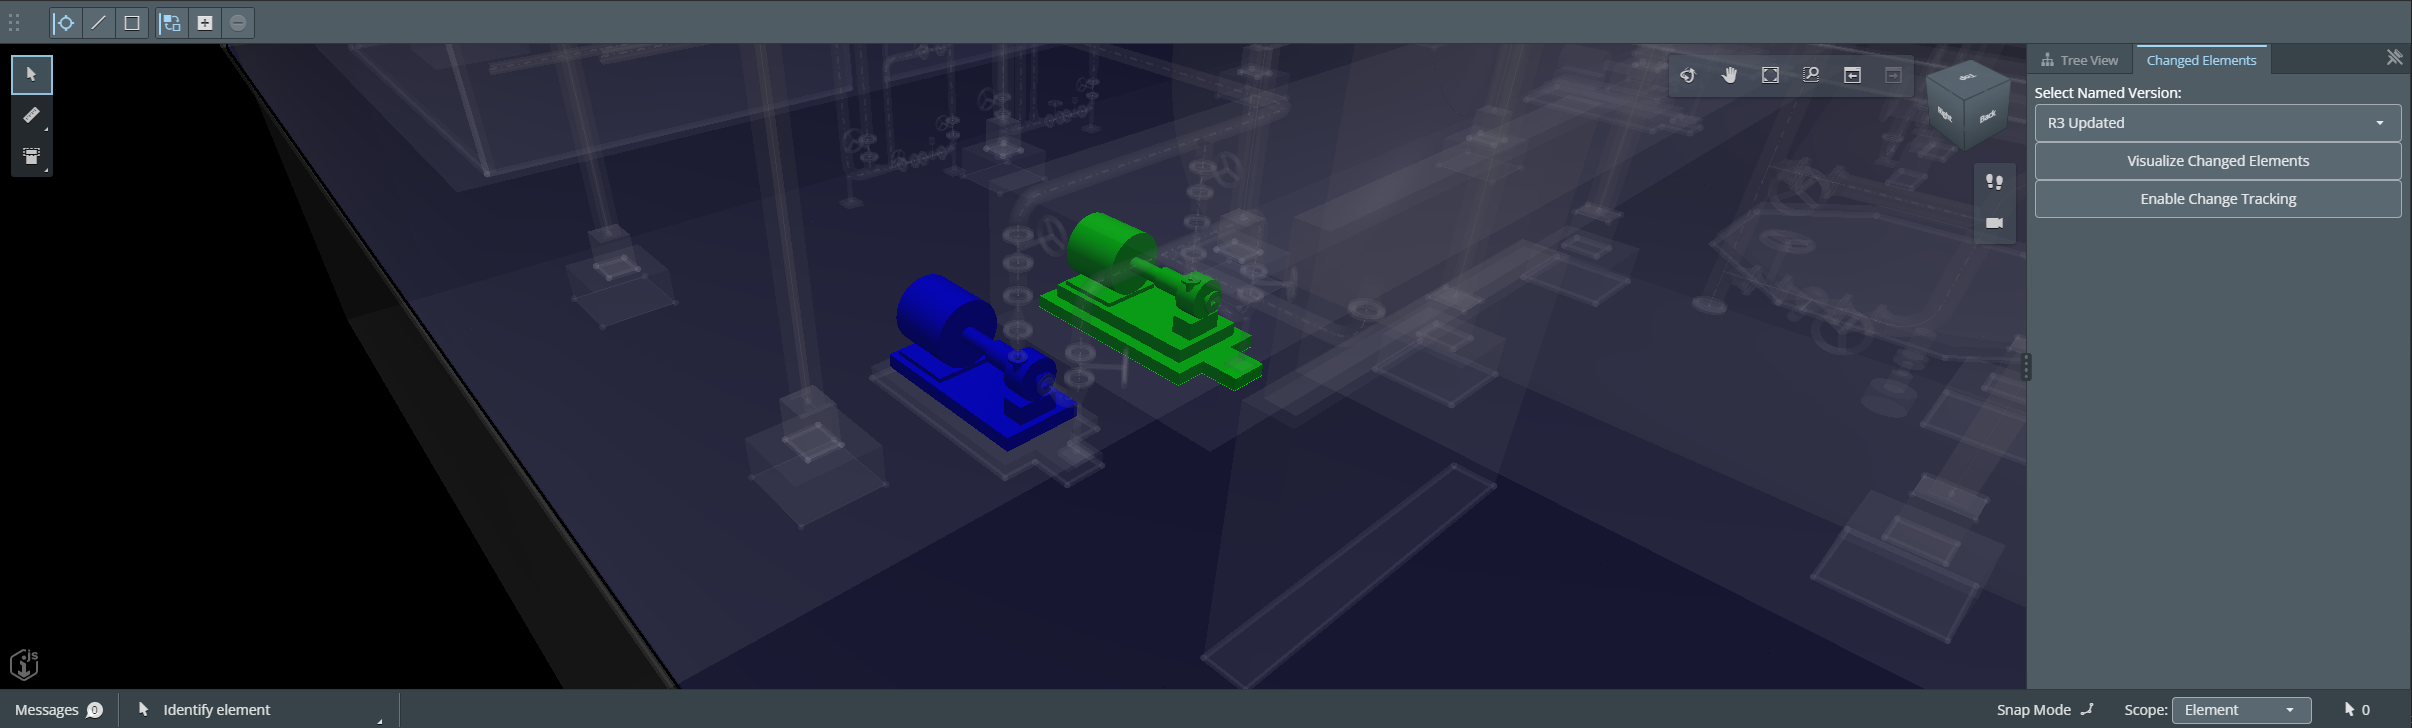
The provider's constructor finds which elements are inserted or updated based on their DbOpcode. Then, it implements the addFeatureOverrides function that will colorize inserted elements as green, updated elements as blue and make everything else transparent gray.
Now that we have a feature override provider that will colorize our elements properly, let's use it in our onVisualizeChangedElements button callback. Import the class in ChangedElementsWidget.tsx.
Before adding a provider to the viewport, t's important to drop any feature override providers from the viewport before we add one to ensure we start with a clean viewport each time.
You should now be able to see the elements colorized, showing inserted elements as green and updated elements as blue whenever we click the visualize button:

Here's what the ChangedElementsFeatureOverrides.ts file should look like when you are done with this section.
Changed Elements Feature Override Provider
import { DbOpcode, Id64String } from "@itwin/core-bentley";
import { ChangedElements, FeatureAppearance } from "@itwin/core-common";
import { FeatureOverrideProvider, FeatureSymbology, Viewport } from "@itwin/core-frontend";

/**
* Feature Override Provider to visualize changed elements and colorize them
* in the viewport
*/
export class ChangedElementsFeatureOverrides implements FeatureOverrideProvider {
// Array of inserted element Ids
private _insertedElements: Id64String[] = [];
// Array of updated element Ids
private _updatedElements: Id64String[] = [];

/**
 * Constructor
 * @param changedElements Changed Elements to visualize
 */
public constructor(changedElements: ChangedElements) {
  // Go over all changed elements array, all arrays are guaranteed to have same size
  for (let i = 0; i < changedElements.elements.length; ++i) {
    // Element Id of the changed element
    const elementId: Id64String = changedElements.elements[i];
    // Operation code of the changed element
    const opcode: DbOpcode = changedElements.opcodes[i];
    // Add the element Id to the proper list
    switch (opcode) {
      case DbOpcode.Delete:
        // Deleted elements do not exist in the current version of the iModel
        // Displaying non-iModel elements in the same view is out of scope for this tutorial
        break;
      case DbOpcode.Update:
        this._updatedElements.push(elementId);
        break;
      case DbOpcode.Insert:
        this._insertedElements.push(elementId);
        break;
    }
  }
}

/**
 * Adds the colorization and emphasis of the elements we care about
 * @param overrides Overrides to be updated with our changed elements
 * @param viewport Viewport we are overriding features on
 */
public addFeatureOverrides(overrides: FeatureSymbology.Overrides, viewport: Viewport): void {
  // Create a default appearance for non-changed elements, set it to transparent light gray
  const defaultAppearance = FeatureAppearance.fromJSON({
    rgb: {r: 200, g: 200, b: 200},
    transparency: 0.9,
    // Make unchanged elements non-locatable
    // This is to allow selecting changed elements that are behind unchanged elements in the view
    nonLocatable: true,
  });
  // Override the default coloring for all other elements
  overrides.setDefaultOverrides(defaultAppearance);

  // Create an appearance with the color green for inserted elements and emphasize them
  const insertedAppearance = FeatureAppearance.fromJSON({
    rgb: {r: 0, g: 255, b: 0},
    emphasized: true,
  });
  // Override the inserted elements with the appearance
  this._insertedElements.forEach((elementId: string) => {
    overrides.override({
      elementId,
      appearance: insertedAppearance
    });
  });

  // Create an appearance with the color blue for updated elements
  const updatedAppearance = FeatureAppearance.fromJSON({
    rgb: {r: 0, g: 0, b: 255},
    emphasized: true
  });
  // Override the updated elements with the appearance
  this._updatedElements.forEach((elementId: string) => {
    overrides.override({
      elementId,
      appearance: updatedAppearance
    });
  });
}
}
Updated Visualize Changed Elements Button Callback
// Updated callback for when clicking the 'Visualize Changed Elements' button
const onVisualizeChangedElements = useCallback(async () => {
  const iModel = props.iModel;
  if (iModel === undefined || iModel.changeset.id === undefined) {
    console.error("iModel is not valid");
    return;
  }
  if (selectedVersion?.changesetId === undefined || selectedVersion.changesetId == null) {
    console.error("Selected version is not defined");
    return;
  }
  const client = new ChangedElementsClient();
  const endChangesetId = iModel.changeset.id;
  const startChangesetId = selectedVersion.changesetId;
  const changedElements = await client.getComparison(
    iModel,
    startChangesetId,
    endChangesetId
  );
  // Log the results to console to inspect them
  console.log(changedElements);

  const viewport = IModelApp.viewManager.selectedView;
  if (changedElements && viewport) {
    // Ensure we are not currently visualizing changed elements
    const oldProvider = viewport.findFeatureOverrideProviderOfType(ChangedElementsFeatureOverrides);
    if (oldProvider) {
      // If we are, drop the override provider so that we start with a clean viewport
      viewport.dropFeatureOverrideProvider(oldProvider);
    }
    // Create our feature override provider object
    const overrideProvider = new ChangedElementsFeatureOverrides(changedElements);
    // Add it to the viewport
    viewport.addFeatureOverrideProvider(overrideProvider);
  }
}, [selectedVersion, props.iModel]);
3.6 About changed properties
We will cover working with properties from Changed Elements API in a different tutorial, but here's an overview of what's provided in the API:
The API returns a properties array that contains the EC Property Access Strings of any properties that had changes between the two versions being queried. The properties array is 2-dimensional, the first index corresponds to the element you are looking at, the second index will allow you to iterate through all properties that changed in the element.
As explained in the Enabling Change Tracking Section, the properties of an element may not live in the element itself, so we can't simply query for its value using ECSQL, the element Id and the property access string.
To properly inspect an elements properties, including properties that do not exist on the element, we need to use iTwin.js Presentation Library, which is out of scope for this tutorial.
The change data also contains the newChecksums and oldChecksums arrays. Each property of an element will have a matching new and old checksum. These arrays are useful to quickly check if the property value indeed has changed, or if it has flipped back and forth to the same value between versions.
4. Making sense of Changed Elements data
The returned data is a JSON object that contains arrays of data. Each of these arrays are of the same length. This length is the number of changed elements that were found during processing.
4.1 Changed Elements JSON
ChangedElements class is defined in the @bentley/imodeljs-common package.
As mentioned before, this interface contains different arrays. Let's go over each of the arrays and what they are:
elements
Contains the element Ids of the changed elements. This is useful if you want to query the iModel for more information about the element.
classIds
Contains the ECClass Ids of the changed elements. This is useful if you want to access specific properties of the element that are in its ECClass.
opcodes
Contains the operation codes that tells us if the element was inserted, updated or deleted in the change. See DbOpcode
type
Contains the type of change that occurred to the element. This number is a bitflag, and can be used to know whether the element had property changes, geometric changes, placement changes, indirect changes and/or hidden property changes.
modelIds
Contains the model Ids of the changed elements. This is useful for visualization purposes, like ensuring the model the changed element resides in is displayed in the viewport.
properties
Contains the property accessor string names of changed properties an element may have. This property accessor string can be used in conjunction with the element's class Id to obtain the property value.
oldChecksums
Contains the old checksum for the property value of the index that matches the property array. This is useful to determine using newChecksums array, whether the property value has indeed changed in the before and after states of the iModel. This is useful because there are cases in which a property may be flipped back and forth, and you may still want to know it was touched, but you can determine whether the change is valuable using a simple checksum comparison.
newChecksums
Contains the new checksum for the property value of the index that matches the property array
parentIds
Contains the parent Id of the element. If the element does not have a parent, this id will be "0"
parentClassIds
Contains the ECClass Id of the parent of the element. If the element does not have a parent, this id will be "0"
Conclusion
Congratulations on completing this tutorial, at this point you should have been able to visualize change using the API! In conclusion, the Changed Elements API can help you understand what elements have changed in your iModel and how they have changed between the given changesets. You could use this API to generate reports, visualize change using an iTwin.js application like we did in this tutorial, or review properties that have changed on the elements that you find relevant in your iModel.
More resources that you may like
Was this page helpful?