Introduction
When developing Single Page Applications (SPA), we use a client-side framework and the following procedures to set up authorization. This tutorial is based on the OAuth workflow, diagram, and steps described in the Native/SPA authorization documentation.
Register your application
The first step for authorizing your SPA is to register your application.
- If you have not created an application, open the My Apps page under your Profile menu and click the Register New button. In this case, the application type is SPA.
- For this tutorial, add the redirect URI,
https://developer.bentley.com/redirect-tutorial, during app registration, or on the App Details for a previously registered application. If you are testing locally or on a deployed app, you will use the redirect URI of your application. - You also need the
client_idof your application. You can copy theclient_idfrom the App page by clicking the Copy button below the title.
Obtain an access token
Once you have your app registered, you can obtain an access token by following these steps:
- Generate code_verifier and code_challenge.
- When the user opens the SPA, redirect them to the authorization server endpoint.
Below is an example request along with required parameters.
You can obtain the client_id and redirect_uri from your app registration on My Apps. You can copy the code_challenge generated above, but note that production code must generate a new code_challenge for each request and never reuse the same value.
-
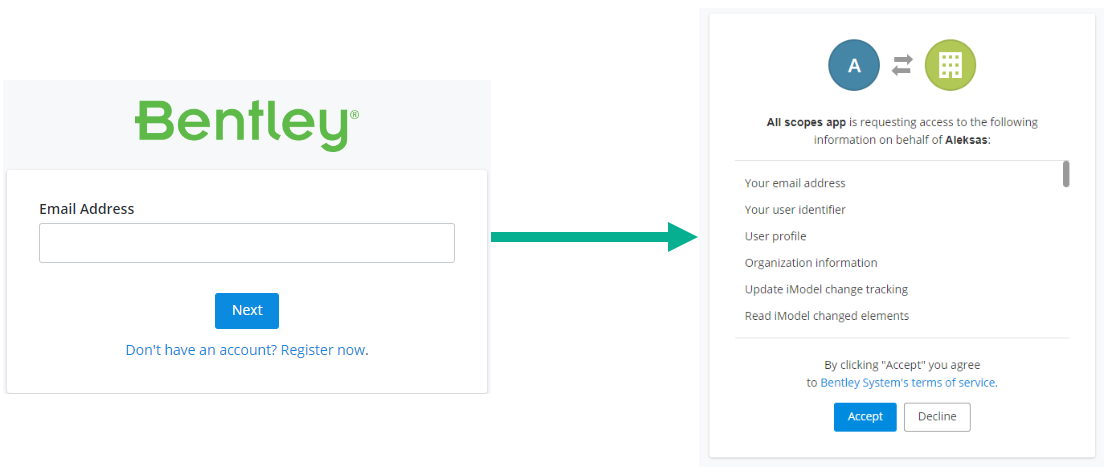
Allow user to login and give consent to the application for calling APIs on their behalf.
-
Once authenticated, extract the
codein the response from theredirect_urithat authorization server is configured to use.https://example-rediect-uri/?code=<code> -
Send a request to the token endpoint to exchange the authorization code for an access token.
POSThttps://ims.bentley.com/connect/token
- Your application can now use the access token returned by the token endpoint to access APIs on behalf of the user.
Refresh token
Unlike native and web apps, SPAs don't require a refresh token when the access token expires. This is because they can renew a session that is about to expire using a background silent sign-in.
Use your token
If you received a 200 OK response to your token request, you have successfully obtained a token. You can use this token to call various iTwin Platform APIs. You can try making an API call to users/me endpoint to test your token. On success, this request returns the profile information for the user account associated with the token received.
Remember, the iTwin Platform Base URI is api.bentley.com.
Client
If you're developing a SPA and need to handle user authentication in a browser environment, you can utilize a TypeScript client specifically designed for this workflow. This client is available in the iTwin auth-clients repository and can be easily integrated into your project via the npm package @itwin/browser-authorization.