Introduction
This tutorial guides you through customizing your iTwin Viewer application by displaying application-specific graphics, called view decorations, in addition to an iModel's geometry.
First, we explore the basics about view decorations, decorators and markers. Then, we create a simple viewer application which displays markers for elements of interest in a 3D iModel.
Info
Skill level:
Basic
Duration:
45 minutes
Prerequisites
This tutorial assumes that you have:
- Your own local source for the iTwin Web Viewer based on the template @itwin/web-viewer
- See the Get Started! tutorial for instructions.
- Configured your local source to open the "House Model" sample iModel.
- See the Create a test iModel from a Bentley provided sample tutorial for instructions on using a sample iModel.
1.1 View Decorations
Using iTwin.js, there are many ways to customize your iTwin Viewer application, such as displaying custom graphics in the viewport. Additionally, to add graphics that are not contained in, or provided by, the iModel, use View Decorations. At their core, view decorations are application-generated graphics supplied to the viewer's render system at runtime. There are three categories of view decorations:
- View Graphic Decorations
- Canvas Decorations
- HTML Decorations
View graphic decorations, of which there are many sub-types, are decorations drawn using the iTwin.js rendering system through WebGL. They allow you to display complex graphics alongside the models' geometry. They are constructed using a GraphicBuilder or by using readGltfGraphics to load glTF assets. Depending on their sub-type, view graphic decorations can be drawn using the view's lighting, shading and render mode. A common use case of view graphic decorations is the display of 3D bounding boxes around certain elements of a model.
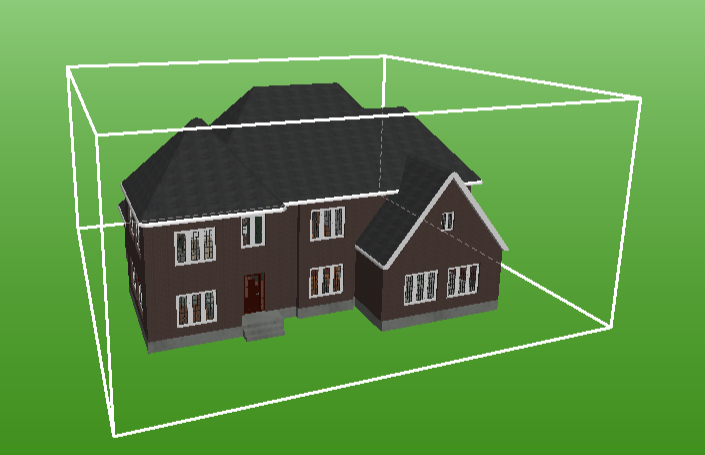
View graphic decorations created using a graphicsBuilder to display a bounding box around the House Model.
Canvas decorations are decorations drawn atop the scene using CanvasRenderingContext2D, which means they always appear in front of your models. They are very useful to display information you do not want to lose sight of behind elements. Canvas decorations are created by implemention the CanvasDecoration interface. The iTwin.js implementation of Sprites uses canvas decorations.
HTML decorations are simply HTML elements added to the DOM on top of your views. They are displayed in front of canvas decorations.
For more information on using view decorations, see View Decorations.
1.2 Decorators
View decorations are added to a viewport using a decorator. A decorator is an object implementing the Decorator interface that manages a set of view decorations. Each time a viewport renders a frame, each registered decorator's decorate method is called. The method receives a DecorateContext, which is used to add the view decorations to be rendered for that frame. Decorators are registered with the ViewManager.addDecorator method.
1.3 Markers
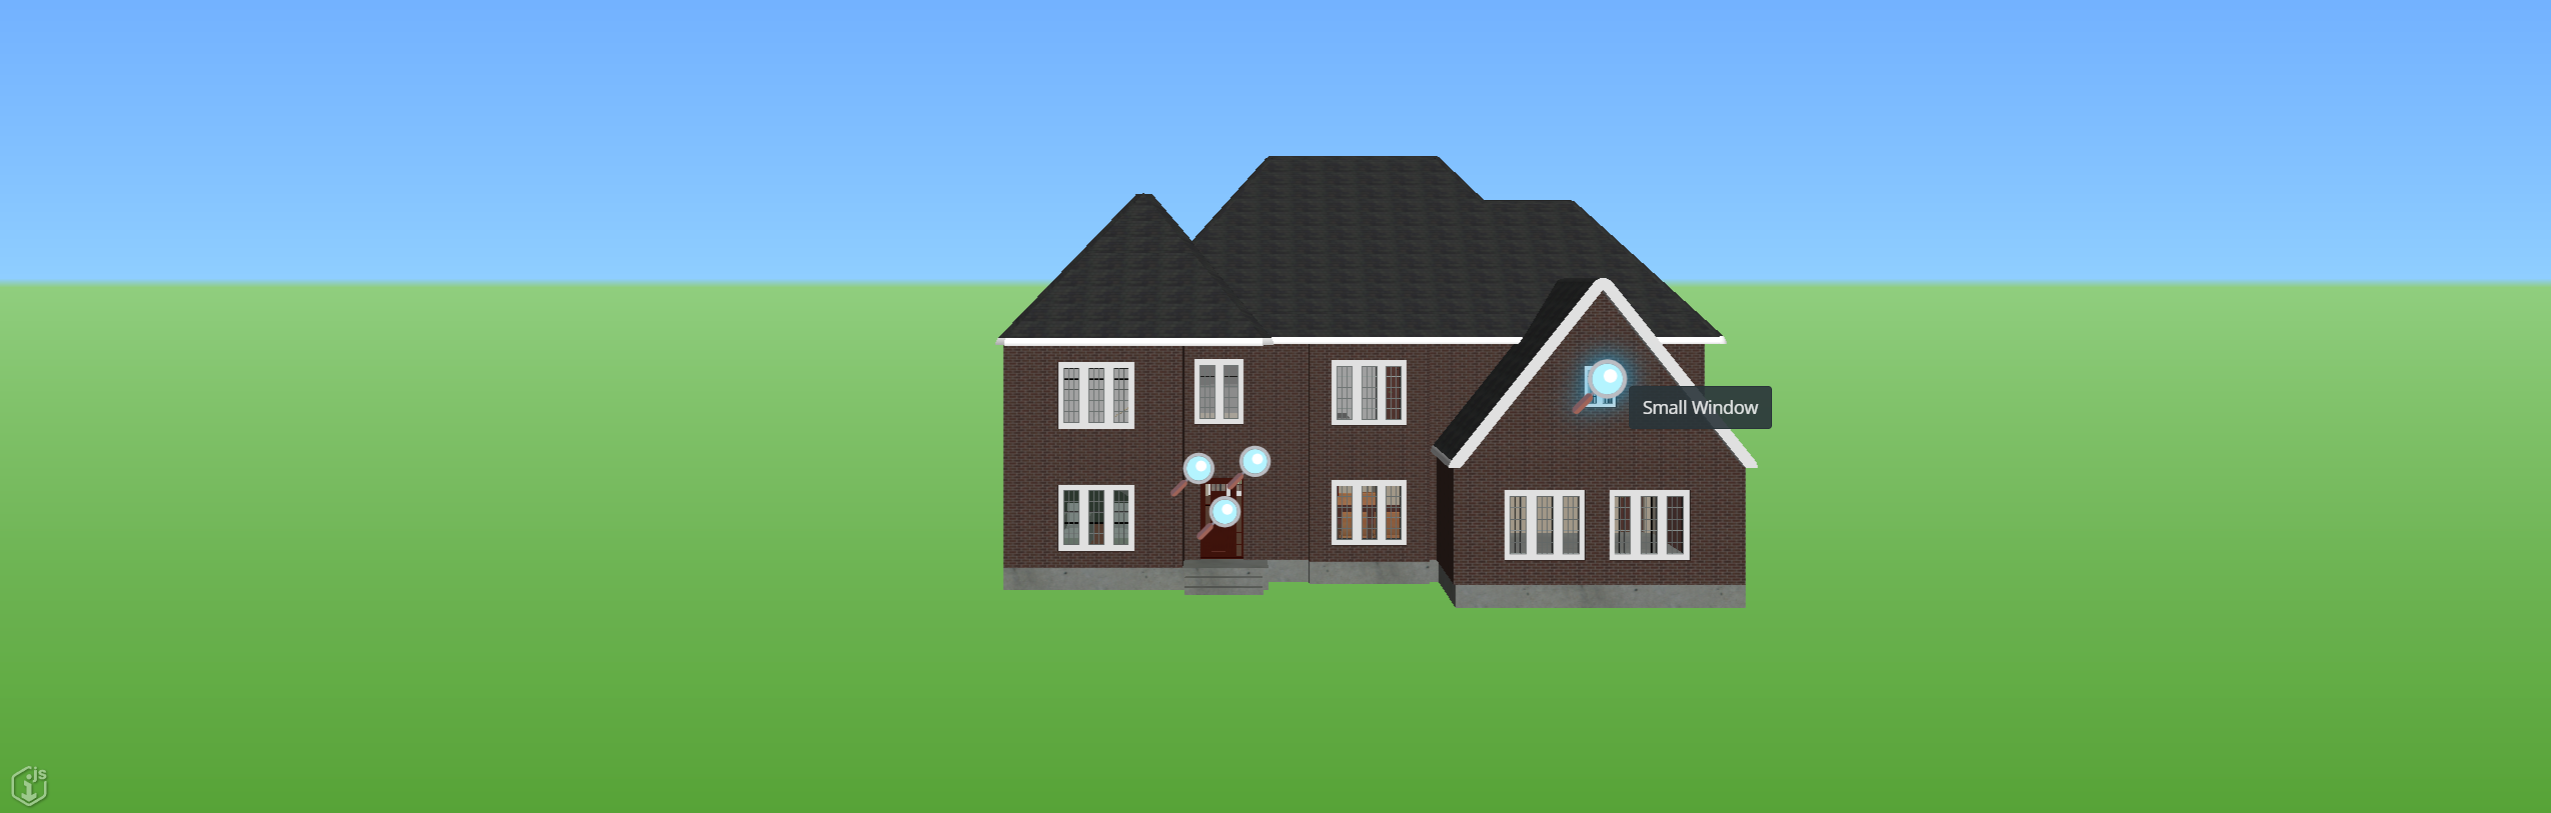
Markers are a convenient way to display information atop the view that follow a fixed point in the world. They are often used as visual indicators showing the location of data from external sources or points of interest in the world. As such, they can present information when hovered and perform actions when clicked. Markers can optionaly display all three types of view decorations.
2. Creating a simple app to display markers for elements of interest
To apply what we have just learned about view decorations, decorators, and markers, we will now create a simple Viewer application using these three features. Our goal is to display markers representing interesting elements in the House Model. Those markers will consist of simple 2D images. When hovered, they will show a name for the element and, when clicked, they will take us to that element.
Note: You can have a look at the Simple Marker Sample App community sandbox to see what your application will look like at the end of this tutorial.
Let's get started!
2.1 Creating our ElementOfInterestMarker class
First off, make sure you are starting from a newly created Viewer Test App. Have a look at the prerequisites if you are unsure how to do that.
Now, let's create a new file called ElementOfInterestMarker.ts in the same directory as your App.tsx file. In this file, we define our custom ElementOfInterestMarker class extending Marker, which we import.
To have all our markers appear the same size, we add the property private static _height = 35; to our class.
We also add private _onMouseButtonCallback: any; to hold each marker's callback function.
We will use those properties in the constructor.
ElementOfInterestMarker class
import { Marker } from "@itwin/core-frontend";

export class ElementOfInterestMarker extends Marker {
private static _height = 35;
private _onMouseButtonCallback: any;
}
Constructor
Indeed, our marker class needs a constructor in which to setup the image to display, its position and size, the tooltip shown when hovered and the callback function triggered when clicked. We define such a constructor, which expects an image, a string for the tooltip, a callback function to call when clicked, and world coordinates.
constructor(image: HTMLImageElement, title: string, onMouseButtonCallback: any, worldLocation: Point3d) {}
As with any constructor of a class extending another, the first line of our constructor must call the parent class's constructor using super. In our case, Marker's constructor expects a Point3d representing the world coordinates of the marker and a Point2d representing its size in pixels. We can directly use worldLocation for the former and a simple calculation gives us the latter, keeping the input image's aspect ratio while reducing its size.
super(
  worldLocation,
  new Point2d(
    image.width * (ElementOfInterestMarker._height / image.height),
    ElementOfInterestMarker._height
  )
);
Then, we assign the callback function to the previously created _onMouseButtonCallback property, set the marker's title, and set the image using setImage.
this._onMouseButtonCallback = onMouseButtonCallback;
this.title = title;
this.setImage(image);
Make sure to add the necessary imports.
import { Point2d, Point3d } from '@itwin/core-geometry';
ElementOfInterestMarker constructor
constructor(
image: HTMLImageElement,
title: string,
onMouseButtonCallback: any,
worldLocation: Point3d,
) {
super(worldLocation, new Point2d(image.width * (ElementOfInterestMarker._height / image.height), ElementOfInterestMarker._height));
this._onMouseButtonCallback = onMouseButtonCallback;
this.title = title;
this.setImage(image);
}
onMouseButton method
To complete our ElementOfInterestMarker class, let's implement its optional onMouseButton method, which is called whenever a mouse button event takes place on the marker. The method receives an instance of BeButtonEvent containing information about the mouse event and returns a boolean. We will trigger a callback when such an event takes place.
In our case, we only want our application to react to mouse events that correspond to the right mouse button. We thus use the condition BeButton.Data !== ev.button to return before doing anything if the button clicked is not the Data (left) button. We also do not want anything to happen when a mouse button is depressed rather than pressed. We thus add the condition !ev.isDown to also return early when the mouse button started from a down position. These two conditions ensure that we only act when the right mouse button is pressed. The other conditions are safeguards to prevent triggering the callback when the viewport is missing or invalid.
if (
  BeButton.Data !== ev.button ||
  !ev.isDown ||
  !ev.viewport ||
  !ev.viewport.view.isSpatialView()
)
  return true;
If none of the above conditions are true, we trigger the callback stored in _onMouseButtonCallback. We always return true to signal the event was processed and not to forward it to other UI elements.
Again, make sure to add the necessary imports.
import { BeButton, BeButtonEvent } from '@itwin/core-frontend';
Just like that, our ElementOfInterestMarker class is complete! You can see the completed file in the code snippet.
We suggest you review the Marker documention, as the class provides many other useful methods and properties to tweak the behavior of your markers.
ElementOfInterestMarker's onMouseButton method
public onMouseButton(ev: BeButtonEvent): boolean {
if (BeButton.Data !== ev.button || !ev.isDown || !ev.viewport || !ev.viewport.view.isSpatialView())
  return true;
this._onMouseButtonCallback();
return true;
}
Complete ElementOfInterestMarker.ts file
import { BeButton, BeButtonEvent, Marker } from "@itwin/core-frontend";
import { Point2d, Point3d } from "@itwin/core-geometry";

export class ElementOfInterestMarker extends Marker {
private static _height = 35;
private _onMouseButtonCallback: any;

constructor(
  image: HTMLImageElement,
  title: string,
  onMouseButtonCallback: any,
  worldLocation: Point3d,
) {
  super(worldLocation, new Point2d(image.width * (ElementOfInterestMarker._height / image.height), ElementOfInterestMarker._height));
  this._onMouseButtonCallback = onMouseButtonCallback;
  this.title = title;
  this.setImage(image);
}

public onMouseButton(ev: BeButtonEvent): boolean {
  if (BeButton.Data !== ev.button || !ev.isDown || !ev.viewport || !ev.viewport.view.isSpatialView())
    return true;
  this._onMouseButtonCallback();
  return true;
}
}
2.2 Creating our ElementOfInterestDecorator class
Now that we have created our marker class, we need to create a decorator which will supply the viewport with the markers to draw on each render. First, create a new file called ElementtOfInterestDecorator.ts.
ElementOfInterest interface
In this file, let's define the interface ElementOfInterest which represents the properties our decorator needs to create an ElementOfInterestMarker for an iModel element. We need the element's id to access information such as its position in the model and a custom title to display as the marker's tooltip. Let's also add a property indicating the best angle to see this element from, which we use to adjust the view when we select the element's marker. Do not forget to import Id64String and StandardViewId.
ElementOfInterest interface
import { Id64String } from "@itwin/core-bentley";
import { StandardViewId } from "@itwin/core-frontend";

export interface ElementOfInterest {
id: Id64String,
title: string,
viewOrientation: StandardViewId
}
ElementOfInterestDecorator class
It's now time to create our decorator. We create the class ElementOfInterestDecorator implementing the Decorator interface in ElementOfInterestDecorator.ts. To store our decorator's markers, we add the property private _markers: ElementOfInterestMarker[] = []; to our class. Then, in the required decorate method, we can call the inherited addDecoration method of each of our markers, supplying the context.
Refer to the code snippet for the necessary imports.
ElementOfInterestDecorator class
import { DecorateContext, Decorator } from "@itwin/core-frontend";
import { ElementOfInterestMarker } from "./ElementOfInterestMarker";

export class ElementOfInterestDecorator implements Decorator {
private _markers: ElementOfInterestMarker[] = [];

public decorate = (context: DecorateContext) => {
  if (context.viewport.view.isSpatialView()) {
    this._markers.forEach(marker => marker.addDecoration(context));
  }
}
}
_zoomToElementCallback method
Our decorator needs to provide the markers with a callback function to move the view to the corresponding element, so we define the method _zoomToElementCallback that receives the element's id and desired view orientation. To achieve the view change, we use the viewport's built-in zoomToElements method. We get the viewport instance through the IModelApp singleton by doing IModelApp.viewManager.selectedView. Don't forget to import it. Then, we call its zoomToElements method with the element id and additional options to specify the view orientation and to animate the view change.
ElementOfInterestDecorator's _zoomToElementCallback method
private _zoomToElementCallback = (elementId: Id64String, viewOrientation: StandardViewId) => {
const vp = IModelApp.viewManager.selectedView;
if (vp !== undefined)
  vp.zoomToElements(elementId, {standardViewId: viewOrientation, animateFrustumChange: true})
}
_createMarker method
Additionaly, we need a method to create a marker for an element and add it to the _markers array of our decorator. Recall our ElementOfInterestMarker's constructor requires an image, a title, a callback function and a location in the world. Our method thus needs as inputs an instance of ElementOfInterest, an image, and an iModelConnection to get the element's world location.
Let's create a _createMarker method with those inputs.
We use our _zoomToElementCallback method to create the marker's callback function, providing the element's id and viewOrientation.
const _onMouseButtonCallback = () =>
  this._zoomToElementCallback(elementProps.id, elementProps.viewOrientation);
To get the element's world location, we can query the IModelConnection. In our case, we fetch the element's placement, which contain its location in the world, by calling iModel.elements.getPlacements with the element's id. From the placements we get the elements center point.
const elementCenter = placements[0].getWorldCorners().getCenter();
Finally, we create a new instance of ElementOfInterestMarker and add it to our decorator's _markers array.
this._markers.push(
  new ElementOfInterestMarker(
    image,
    elementProps.title,
    _onMouseButtonCallback,
    elementCenter
  )
);
However, getPlacements() is an async method, so we need to wrap the previous lines inside a Promise.then statement.
iModel.elements.getPlacements(elementProps.id).then((placements) => {...});
Refer to the code snippet for the necessary import statements.
ElementOfInterestDecorator's _createMarker method
private _createMarker = (elementProps: ElementOfInterest, image: HTMLImageElement, iModel: IModelConnection) => {
const _onMouseButtonCallback = () => this._zoomToElementCallback(elementProps.id, elementProps.viewOrientation);
iModel.elements.getPlacements(elementProps.id).then((placements) => {
  const elementCenter = placements[0].getWorldCorners().getCenter();
  this._markers.push(new ElementOfInterestMarker(image, elementProps.title, _onMouseButtonCallback, elementCenter));
});
}
Constructor
To complete our decorator class, let's add a constructor that creates the markers from a supplied image, an array of ElementOfInterest and an IModelConnection. We simply call the _createMarker method for each of the elements in the supplied array.
elements.forEach((element) => {
  this._createMarker(element, image, iModel);
});
Again, make sure to import the required objects.
Our decorator class is now complete, you can see the final contents of ElementOfInterestDecorator.ts in the code snippet.
ElementOfInterestDecorator's constructor
constructor(elements: ElementOfInterest[], image: HTMLImageElement, iModel: IModelConnection) {
elements.forEach((element) => {this._createMarker(element, image, iModel)});
}
Finalized contents of ElementOfInterestDecorator.ts
import { Id64String } from "@itwin/core-bentley";
import { DecorateContext, Decorator, IModelApp, IModelConnection, StandardViewId } from "@itwin/core-frontend";
import { ElementOfInterestMarker } from "./ElementOfInterestMarker";

export interface ElementOfInterest {
id: Id64String,
title: string,
viewOrientation: StandardViewId
}

export class ElementOfInterestDecorator implements Decorator {
private _markers: ElementOfInterestMarker[] = [];

private _zoomToElementCallback = (elementId: Id64String, viewOrientation: StandardViewId) => {
  const vp = IModelApp.viewManager.selectedView;
  if (vp !== undefined)
    vp.zoomToElements(elementId, {standardViewId: viewOrientation, animateFrustumChange: true})
}

private _createMarker = (element: ElementOfInterest, image: HTMLImageElement, iModel: IModelConnection, ) => {
  const _onMouseButtonCallback = () => this._zoomToElementCallback(element.id, element.viewOrientation);
  iModel.elements.getPlacements(element.id).then((placements) => {
    const elementCenter = placements[0].getWorldCorners().getCenter();
    this._markers.push(new ElementOfInterestMarker(image, element.title, _onMouseButtonCallback, elementCenter));
  });
}

constructor(elements: ElementOfInterest[], image: HTMLImageElement, iModel: IModelConnection) {
  elements.forEach((element) => {this._createMarker(element, image, iModel)});
}

public decorate = (context: DecorateContext) => {
  if (context.viewport.view.isSpatialView()) {
    this._markers.forEach(marker => marker.addDecoration(context));
  }
}
}
2.3 Modifying App.tsx
We have created our marker class and our decorator class. All that remains is to create our decorator instance and supply it to the Viewer's ViewManager in App.tsx.
Our decorator's constructor requires an array of ElementOfInterest from which to create markers. In this tutorial, we supply these manually.
const elements: ElementOfInterest[] = [
  { id: '0x12c', title: 'Front Door', viewOrientation: StandardViewId.Front },
  { id: '0x1fa', title: 'Small Window', viewOrientation: StandardViewId.Front },
  { id: '0xf15', title: 'Patio Door', viewOrientation: StandardViewId.Back },
  { id: '0x26c', title: 'Television', viewOrientation: StandardViewId.Right },
];
In a real application, we would problably receive this information from an external source or through user interaction with our app.
The constructor also requires an image in the form of and HTMLImageElement. To generate it, save an HTML-compatible image file in the app's public directory.
You can download this image,

or you may download a different compatible one from elsewhere on the internet.
Then, load the image using the utility function imageElementFromUrl, which is async.
const markerImagePromise = imageElementFromUrl('magnifying-glass.svg');
Lastly, our decorator's constructor requires an IModelConnection, which is set up by the Viewer component. Conveniently, the Viewer component accepts an optional onIModelConnected property to supply a function to be called when the connection to the iModel is established. The function is called with the IModelConnection as input. We define such a function, which we use to instantiate our decorator and supply it to the viewManager.
const onIModelConnected = async (iModel: IModelConnection) => {
  const elementOfInterestdecorator = new ElementOfInterestDecorator(
    elements,
    await imageElementFromUrl(markerImageUrl),
    iModel
  );
  IModelApp.viewManager.addDecorator(elementOfInterestdecorator);
};
Notice our function is async because we wait on the image's promise to be resolved.
Now, we supply the function to the Viewer component by setting onIModelConnected={onIModelConnected}. Also, make sure to add the necessary import statements.
Congratulations, your first Viewer Application using view decorations is now complete!
Make sure to try it out by running npm start and then opening https://localhost:3000 in your browser.
Note: If you wish to get rid of the black background in your app, you can turn on the default skybox by adding skyboxOn: true to the viewCreatorOptions.
const viewCreatorOptions = useMemo(
  () => ({ viewportConfigurer: viewConfiguration, skyboxOn: true }),
  [viewConfiguration]
);
Finalized contents of App.tsx
import "./App.scss";

import { BrowserAuthorizationClient } from "@itwin/browser-authorization";
import { FitViewTool, imageElementFromUrl, IModelApp, IModelConnection, StandardViewId } from "@itwin/core-frontend";
import type { ScreenViewport } from "@itwin/core-frontend";
import { FillCentered } from "@itwin/core-react";
import { ProgressLinear } from "@itwin/itwinui-react";
import {
useAccessToken,
Viewer,
ViewerPerformance,
} from "@itwin/web-viewer-react";
import React, { useCallback, useEffect, useMemo, useState } from "react";

import { history } from "./history";

import { ElementOfInterest, ElementOfInterestDecorator } from "./ElementOfInterestDecorator";

const App: React.FC = () => {
const [iModelId, setIModelId] = useState(process.env.IMJS_IMODEL_ID);
const [iTwinId, setITwinId] = useState(process.env.IMJS_ITWIN_ID);

const accessToken = useAccessToken();

const authClient = useMemo(
  () =>
    new BrowserAuthorizationClient({
      scope: process.env.IMJS_AUTH_CLIENT_SCOPES ?? "",
      clientId: process.env.IMJS_AUTH_CLIENT_CLIENT_ID ?? "",
      redirectUri: process.env.IMJS_AUTH_CLIENT_REDIRECT_URI ?? "",
      postSignoutRedirectUri: process.env.IMJS_AUTH_CLIENT_LOGOUT_URI,
      responseType: "code",
      authority: process.env.IMJS_AUTH_AUTHORITY,
    }),
  []
);

const login = useCallback(async () => {
  try {
    await authClient.signInSilent();
  } catch {
    await authClient.signIn();
  }
}, [authClient]);

useEffect(() => {
  void login();
}, [login]);

useEffect(() => {
  if (accessToken) {
    const urlParams = new URLSearchParams(window.location.search);
    if (urlParams.has("iTwinId")) {
      setITwinId(urlParams.get("iTwinId") as string);
    } else {
      if (!process.env.IMJS_ITWIN_ID) {
        throw new Error(
          "Please add a valid iTwin ID in the .env file and restart the application or add it to the iTwinId query parameter in the url and refresh the page. See the README for more information."
        );
      }
    }

    if (urlParams.has("iModelId")) {
      setIModelId(urlParams.get("iModelId") as string);
    } else {
      if (!process.env.IMJS_IMODEL_ID) {
        throw new Error(
          "Please add a valid iModel ID in the .env file and restart the application or add it to the iModelId query parameter in the url and refresh the page. See the README for more information."
        );
      }
    }
  }
}, [accessToken]);

useEffect(() => {
  if (accessToken && iTwinId && iModelId) {
    history.push(`?iTwinId=${iTwinId}&iModelId=${iModelId}`);
  }
}, [accessToken, iTwinId, iModelId]);

/** NOTE: This function will execute the "Fit View" tool after the iModel is loaded into the Viewer.
 * This will provide an "optimal" view of the model. However, it will override any default views that are
 * stored in the iModel. Delete this function and the prop that it is passed to if you prefer
 * to honor default views when they are present instead (the Viewer will still apply a similar function to iModels that do not have a default view).
 */
const viewConfiguration = useCallback((viewPort: ScreenViewport) => {
  // default execute the fitview tool and use the iso standard view after tile trees are loaded
  const tileTreesLoaded = () => {
    return new Promise((resolve, reject) => {
      const start = new Date();
      const intvl = setInterval(() => {
        if (viewPort.areAllTileTreesLoaded) {
          ViewerPerformance.addMark("TilesLoaded");
          void ViewerPerformance.addAndLogMeasure(
            "TileTreesLoaded",
            "ViewerStarting",
            "TilesLoaded",
            viewPort.numReadyTiles
          );
          clearInterval(intvl);
          resolve(true);
        }
        const now = new Date();
        // after 20 seconds, stop waiting and fit the view
        if (now.getTime() - start.getTime() > 20000) {
          reject();
        }
      }, 100);
    });
  };

  tileTreesLoaded().finally(() => {
    void IModelApp.tools.run(FitViewTool.toolId, viewPort, true, false);
    viewPort.view.setStandardRotation(StandardViewId.Iso);
  });
}, []);

const viewCreatorOptions = useMemo(
  () => ({ viewportConfigurer: viewConfiguration, skyboxOn: true }),
  [viewConfiguration]
);

/**
* List of model elements we will create markers for.
* In a typical application, we would get these by querying the iModel or from an external source.
*/
const elements: ElementOfInterest[] = [
  {id: "0x12c", title: "Front Door", viewOrientation: StandardViewId.Front},
  {id: "0x1fa", title: "Small Window", viewOrientation: StandardViewId.Front},
  {id: "0xf15", title: "Patio Door", viewOrientation: StandardViewId.Back},
  {id: "0x26c", title: "Television", viewOrientation: StandardViewId.Right},
];

/**
* Our marker image
*/
const markerImagePromise = imageElementFromUrl("magnifying-glass.svg");

/**
* Function we will be called when the iModelConnection is established.
* We provide our decorator with the list of elements we wish to create markers for,
* then we add our decorator to the viewManager.
*/
const onIModelConnected = async (iModel: IModelConnection) => {
  const elementOfInterestdecorator = new ElementOfInterestDecorator(
    elements,
    await markerImagePromise,
    iModel
  );
  IModelApp.viewManager.addDecorator(elementOfInterestdecorator);
}

return (
  <div className="viewer-container">
    {!accessToken && (
      <FillCentered>
        <div className="signin-content">
          <ProgressLinear indeterminate={true} labels={["Signing in..."]} />
        </div>
      </FillCentered>
    )}
    <Viewer
      iTwinId={iTwinId}
      iModelId={iModelId}
      authClient={authClient}
      viewCreatorOptions={viewCreatorOptions}
      enablePerformanceMonitors={true} // see description in the README (https://www.npmjs.com/package/@itwin/desktop-viewer-react)
      onIModelConnected={onIModelConnected} // The viewer calls this function when the connection is established
    />
  </div>
);
};

export default App;
More resources that you may like
Was this page helpful?